Overview
Apache Derby,
an Apache DB subproject,
is a relational database implemented in Java.
Its footprint is so small you can easily embed it in any Java-based solution.
In addition to its embedded framework,
Derby supports a more familiar client/server framework with the
Derby Network Server.
This tutorial introduces Derby's basic features and
walks you through using both frameworks;
first the embedded framework using the Derby Embedded JDBC driver,
then the Network Server framework using the
Derby Network Client JDBC driver.
Intended Audience
This tutorial is intended for new Derby users who have
had at least light exposure to SQL, Java, and JDBC.
Tutorial Topics
This tutorial is organized into the sections below:
-
Install Software shows how to:
- Install the Apache Derby software.
- Configure your environment to use the Derby Embedded JDBC driver.
- Verify your installation with the sysinfo tool.
- ij Basics shows how to use the ij tool with the embedded Derby JDBC driver to create a database and execute SQL queries.
- Embedded Derby shows how to compile and run a simple Java application that uses the Derby Embedded JDBC driver.
-
Derby Network Server show how to:
- Start the Derby Network Server.
- Configure your environment to use the Derby Network Client JDBC driver.
- Compile and run a simple Java application that uses the network server.
---------------------------
Step 1: Install Software
Introduction
This tutorial
requires the Java Development Kit (JDK)
and the Apache Derby software.
First, this section describes which JDK release is required, asks you to install it if you haven't already, then shows you how to configure and verify your installation.
Next, it shows you how to install the Apache Derby software, configure your environment to use the Derby Embedded JDBC driver, and verify your installation with the Derby sysinfo tool.
Java Development Kit (JDK)
Derby requires Java 2 Standard Edition (J2SE) 8 or higher.
Only the Java Runtime Environment (JRE) is required to run Derby,
but this tutorial compiles a Java application, so it requires
the Java Development Kit (JDK).
If you already have a JDK installed, verify you are configured to use it, then proceed to the Apache Derby installation section.
If you already have a JDK installed, verify you are configured to use it, then proceed to the Apache Derby installation section.
Install JDK
If you have not already installed a JDK, download and install it now. No specific vendor implementation is required; the only requirement is that it be certified for J2SE 8 or higher. Java's reference implementation is at http://www.oracle.com/technetwork/java/javase/downloads/index.html. After installing the JDK of your choice, proceed to the next section.Configure JDK
Set the JAVA_HOME environment variable to the root location of the JDK installation directory. The examples below use C:\jdk1.8 for Windows and /opt/jdk1.8 for UNIX, but be sure to use the actual location on your system. (e.g. The default installation location used by the JDK installer might be something like C:\Program Files\Java\jdk1.8.0_11-b21)
Windows:
C:\> set JAVA_HOME=C:\jdk1.8
UNIX Korn Shell:
$ export JAVA_HOME=/opt/jdk1.8
Next set the PATH environment variable to include the JDK
bin directory.
The PATH variable tells the operating system where to find the
java interpreter and the javac compiler.
Windows:
C:\> set PATH=%PATH%;%JAVA_HOME%\bin
In Windows, these environment variables can also be set from - right
click "My Computer" -> Advanced -> Environment Variables.
UNIX Korn Shell:
$ export PATH=$JAVA_HOME/bin:$PATH
Verify JDK
Use the java -version command, as shown below, to verify the installed release:
java -version
java version "1.8.0_11"
Java(TM) SE Runtime Environment (build 1.8.0_11-b21)
Java HotSpot(TM) 64-Bit Server VM (build 23.6-b04, mixed mode)
The output you see may be different from what is shown above because
the java -version command outputs vendor-specific information;
however, if you don't see what looks like valid version information, then
STOP!
And don't proceed until you resolve that problem.
Apache Derby
Download Derby
Download the binary Apache Derby distribution from the Derby web site at http://db.apache.org/derby/derby_downloads.html. These tutorial instructions use version 10.14.1.0 and assume you downloaded one of the binary distribution files listed in the table below:| Operating System | Download File |
|---|---|
| Windows | db-derby-10.14.1.0-bin.zip |
| UNIX, Linux, and Mac | db-derby-10.14.1.0-bin.tar.gz |
Install Derby
Choose the directory into which you want to install the Derby software. You must have write permissions to this directory. The sample instructions below use C:\Apache for Windows and /opt/Apache for UNIX; be sure to use your actual location. Copy the software distribution to the location you choose, then extract it as shown below.
Windows (use your extraction tool e.g. WinZip -- these instructions use mks unzip):
mkdir C:\Apache
copy db-derby-10.14.1.0-bin.zip C:\Apache
cd C:\Apache
unzip db-derby-10.14.1.0-bin.zip
UNIX:
mkdir /opt/Apache
cp db-derby-10.14.1.0-bin.tar.gz /opt/Apache
cd /opt/Apache
tar xzvf db-derby-10.14.1.0-bin.tar.gz
In both cases, the software will now be extracted into a subdirectory
named db-derby-10.14.1.0-bin.
Set DERBY_INSTALL
Set the DERBY_INSTALL variable to the location where you installed Derby. Examples are shown below, but be sure to use the actual location on your system:
Windows:
C:\> set DERBY_INSTALL=C:\Apache\db-derby-10.14.1.0-bin
UNIX Korn Shell:
$ export DERBY_INSTALL=/opt/Apache/db-derby-10.14.1.0-bin
Configure Embedded Derby
To use Derby in its embedded mode set your CLASSPATH to include the jar files listed below:- derby.jar: contains the Derby engine and the Derby Embedded JDBC driver
- derbytools.jar: optional, provides the ij tool that is used by a couple of sections in this tutorial
Windows:
C:\> set CLASSPATH=%DERBY_INSTALL%\lib\derby.jar;%DERBY_INSTALL%\lib\derbytools.jar;.
UNIX:
$ export CLASSPATH=$DERBY_INSTALL/lib/derby.jar:$DERBY_INSTALL/lib/derbytools.jar:.
Notice that multiple entries in the class path are separated by a
semicolon (;) on Windows and a colon (:) on UNIX.
The Derby software provides another way to set CLASSPATH, using shell scripts (UNIX) and batch files (Windows). This tutorial shows how to set CLASSPATH explicitly and also how to use the Derby scripts to set it.
Change directory now into the DERBY_INSTALL/bin directory. The setEmbeddedCP.bat (Windows) and setEmbeddedCP (UNIX) scripts use the DERBY_INSTALL variable to set the CLASSPATH for Derby embedded usage. You can edit the script itself to set DERBY_INSTALL, or you can let the script get DERBY_INSTALL from your environment. Since you already set DERBY_INSTALL in the "Set DERBY_INSTALL" section above, you don't need to edit the script, so go ahead and execute it as shown below:
Windows:
C:\> cd %DERBY_INSTALL%\bin
C:\Apache\db-derby-10.14.1.0-bin\bin> setEmbeddedCP.bat
UNIX:
$ cd $DERBY_INSTALL/bin
$ . setEmbeddedCP
Verify Derby
Run the sysinfo command, as shown below, to output Derby system information:
java org.apache.derby.tools.sysinfo
Successful output will look something like this:
------------------ Java Information ------------------
Java Version: 1.8.0
Java Vendor: Oracle Corporation
Java home: /Library/Java/JavaVirtualMachines/jdk1.8.0.jdk/Contents/Home/jre
Java classpath: /Users/me/src:/Users/me/sw/z/db-derby-10.14.1.0-bin/lib/derby.jar:/Users/me/sw/z/db-derby-10.14.1.0-bin/lib/derby.war:/Users/me/sw/z/db-derby-10.14.1.0-bin/lib/derbyLocale_cs.jar:/Users/me/sw/z/db-derby-10.14.1.0-bin/lib/derbyLocale_de_DE.jar:/Users/me/sw/z/db-derby-10.14.1.0-bin/lib/derbyLocale_es.jar:/Users/me/sw/z/db-derby-10.14.1.0-bin/lib/derbyLocale_fr.jar:/Users/me/sw/z/db-derby-10.14.1.0-bin/lib/derbyLocale_hu.jar:/Users/me/sw/z/db-derby-10.14.1.0-bin/lib/derbyLocale_it.jar:/Users/me/sw/z/db-derby-10.14.1.0-bin/lib/derbyLocale_ja_JP.jar:/Users/me/sw/z/db-derby-10.14.1.0-bin/lib/derbyLocale_ko_KR.jar:/Users/me/sw/z/db-derby-10.14.1.0-bin/lib/derbyLocale_pl.jar:/Users/me/sw/z/db-derby-10.14.1.0-bin/lib/derbyLocale_pt_BR.jar:/Users/me/sw/z/db-derby-10.14.1.0-bin/lib/derbyLocale_ru.jar:/Users/me/sw/z/db-derby-10.14.1.0-bin/lib/derbyLocale_zh_CN.jar:/Users/me/sw/z/db-derby-10.14.1.0-bin/lib/derbyLocale_zh_TW.jar:/Users/me/sw/z/db-derby-10.14.1.0-bin/lib/derbyclient.jar:/Users/me/sw/z/db-derby-10.14.1.0-bin/lib/derbynet.jar:/Users/me/sw/z/db-derby-10.14.1.0-bin/lib/derbyoptionaltools.jar:/Users/me/sw/z/db-derby-10.14.1.0-bin/lib/derbyrun.jar:/Users/me/sw/z/db-derby-10.14.1.0-bin/lib/derbytools.jar:/Users/me/sw/db2jcc/lib/db2jcc.jar:/Users/me/sw/db2jcc/lib/db2jcc_license_c.jar:/Users/me/sw/mysql/connectorj/mysql-connector-java-5.0.7/mysql-connector-java-5.0.7-bin.jar:/Users/me/sw/demo/jdbc.concurrent/jars/jdbc-concurrent.jar:/Users/me/sw/demo/tableFunctionWhitePaper/jars/vtis-example.jar
OS name: Mac OS X
OS architecture: x86_64
OS version: 10.11.5
Java user name: me
Java user home: /Users/me
Java user dir: /Users/me/derby/branches/10.14
java.specification.name: Java Platform API Specification
java.specification.version: 1.8
java.runtime.version: 1.8.0-b132
--------- Derby Information --------
[/Users/me/sw/z/db-derby-10.14.1.0-bin/lib/derby.jar] 10.14.1.0 - (1808820)
[/Users/me/sw/z/db-derby-10.14.1.0-bin/lib/derbytools.jar] 10.14.1.0 - (1808820)
[/Users/me/sw/z/db-derby-10.14.1.0-bin/lib/derbynet.jar] 10.14.1.0 - (1808820)
[/Users/me/sw/z/db-derby-10.14.1.0-bin/lib/derbyclient.jar] 10.14.1.0 - (1808820)
[/Users/me/sw/z/db-derby-10.14.1.0-bin/lib/derbyoptionaltools.jar] 10.14.1.0 - (1808820)
------------------------------------------------------
----------------- Locale Information -----------------
Current Locale : [English/United States [en_US]]
Found support for locale: [cs]
version: 10.14.1.0 - (1808820)
Found support for locale: [de_DE]
version: 10.14.1.0 - (1808820)
Found support for locale: [es]
version: 10.14.1.0 - (1808820)
Found support for locale: [fr]
version: 10.14.1.0 - (1808820)
Found support for locale: [hu]
version: 10.14.1.0 - (1808820)
Found support for locale: [it]
version: 10.14.1.0 - (1808820)
Found support for locale: [ja_JP]
version: 10.14.1.0 - (1808820)
Found support for locale: [ko_KR]
version: 10.14.1.0 - (1808820)
Found support for locale: [pl]
version: 10.14.1.0 - (1808820)
Found support for locale: [pt_BR]
version: 10.14.1.0 - (1808820)
Found support for locale: [ru]
version: 10.14.1.0 - (1808820)
Found support for locale: [zh_CN]
version: 10.14.1.0 - (1808820)
Found support for locale: [zh_TW]
version: 10.14.1.0 - (1808820)
------------------------------------------------------
The output on your system will probably be somewhat different
from the output shown above,
but it should reflect the correct location
of jar files on your machine and there shouldn't be any errors.
If you see an error like the one below,
it means your class path is not correctly set:
$ java org.apache.derby.tools.sysinfo
Exception in thread "main" java.lang.NoClassDefFoundError:
org/apache/derby/tools/sysinfo
Echo your CLASSPATH, as shown below,
then double check each entry in your class path to verify that the jar file
is where you expect it:
Windows:
C:\> echo %CLASSPATH%
C:\Apache\DB-DER~1.1-B\lib\derby.jar;C:\Apache\DB-DER~1.1-B\lib\derbytools.jar;
UNIX:
$ echo $CLASSPATH
/opt/Apache/db-derby-10.14.1.0-bin/lib/derby.jar:/opt/Apache/db-derby-10.14.1.0-bin/lib/derbytools.jar:
------------------------------------
Step 2: ij Basics
Introduction
ij is an interactive SQL scripting tool that comes with Derby.
It can be used with the Derby Embedded JDBC driver
or with a client JDBC driver, such as the Derby Network Client.
This section uses the Derby Embedded JDBC driver to introduce a few ij features. The information presented here is minimal, just enough to get you started. For a more complete introduction, see the Getting started with ij section in the Tools and Utilities Guide.
This section uses the Derby Embedded JDBC driver to introduce a few ij features. The information presented here is minimal, just enough to get you started. For a more complete introduction, see the Getting started with ij section in the Tools and Utilities Guide.
Set the environment
To set up the environment,
follow the
"Configure Embedded Derby"
instructions.
Start up ij
Start up ij with this command:
java org.apache.derby.tools.ij
You should see the output shown below:
ij version 10.4
ij>
The error below means the class path isn't set correctly:
java org.apache.derby.tools.ij
Exception in thread "main" java.lang.NoClassDefFoundError: org/apache/derby/tools/ij
For help resolving class path problems, see the
"Configure Embedded Derby"
and
"Verify Derby"
instructions.
Create a database
To create a database,
specify the create=true attribute
in the connection URL.
For example, the command below creates a new database called
MyDbTest:
ij> connect 'jdbc:derby:MyDbTest;create=true';
Now exit ij:
ij> exit;
List the contents of your directory with
ls (UNIX) or
dir (Windows).
On UNIX you'll see output like this:
$ ls
MyDbTest derby.log
The MyDbTest directory contains the files that make up
the database you just created.
The derby.log file is an error log, which is helpful
whenever things don't work as expected.
Connect to a database
Start up ij again and
connect to the database you just created:
Let's say that your current directory location is /home/bill/databases and that you decide to change your directory to a different place entirely. You can connect to the MyDbTest database by specifying the complete directory path, like this:
java org.apache.derby.tools.ij
ij> connect 'jdbc:derby:MyDbTest';
We'll take a quick look at the
protocol ("jdbc:derby:") and
database ("MyDbTest") in this connection URL.
Protocol
Internally, ij determines by default which driver to load from the protocol ("jdbc:derby:"). In this case, it knows to load the embedded JDBC driver. We could also have specified the protocol with a property as shown below:
java -Dij.protocol=jdbc:derby: org.apache.derby.tools.ij
ij> connect 'MyDbTest';
For more information about ij startup properties see
Starting
ij using properties in the
Tools
and Utilities Guide.
Database
Connecting to the MyDbTest database in the connection URL above works because the MyDbTest database directory is in the current working directory; i.e., the directory where you started up ij.Let's say that your current directory location is /home/bill/databases and that you decide to change your directory to a different place entirely. You can connect to the MyDbTest database by specifying the complete directory path, like this:
java org.apache.derby.tools.ij
ij> connect 'jdbc:derby:/home/bill/databases/MyDbTest';
You could also specify the Derby system home for the database like this:
java org.apache.derby.tools.ij -Dderby.system.home=/home/bill/databases
ij> connect 'jdbc:derby:MyDbTest';
The Developer's Guide provides information
about where Derby looks for databases:
Execute SQL statements
Once you connect to a database, you can execute SQL statements.
ij expects each statement to be terminated
with a semicolon (;); for example:
ij> create table derbyDB(num int, addr varchar(40));
ij> insert into derbyDB values (1956,'Webster St.');
ij> insert into derbyDB values (1910,'Union St.');
ij> update derbyDB set num=180, addr='Grand Ave.' where num=1956;
ij> select * from derbyDb;
Disconnect from a database
Exit
Run SQL Scripts
You can execute SQL scripts in ij as shown below:
ij> run 'my_file.sql';
You can also run SQL scripts from the command line:
java org.apache.derby.tools.ij my_file.sql
The Tools and Utilities Guide
provides more information about running SQL scripts from ij.-------------------------------
Step 3: Embedded Derby
Introduction
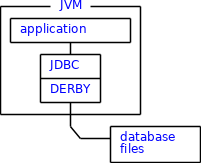
When an application accesses a Derby database using the Embedded Derby JDBC
driver,
the Derby engine does not run in a separate process, and there are no
separate database processes to start up and shut down.
Instead, the Derby database engine runs inside the same
Java Virtual Machine (JVM) as the application.
So, Derby becomes part of the application
just like any other jar file that the application uses.
Figure 1 depicts this embedded architecture.
Figure 1: Derby Embedded Architecture
This section shows how to compile and run a simple Java application using the Derby Embedded JDBC driver. The information presented is deliberately simple. For complete information, see the Derby Developer's Guide.
Figure 1: Derby Embedded Architecture
This section shows how to compile and run a simple Java application using the Derby Embedded JDBC driver. The information presented is deliberately simple. For complete information, see the Derby Developer's Guide.
Set the environment
To set up the environment,
follow the
"Configure Embedded Derby"
instructions.
Sample Application
Copy sample application
The Derby software includes a sample application called SimpleApp.java. In Derby 10.2 and above it is located in the DERBY_INSTALL/demo/programs/simple/ directory. (In Derby 10.1 it is located in the DERBY_INSTALL/demo/simple/ directory.) Copy that application into your current directory.By default this application runs in embedded mode and does the following:
- Starts up the Derby engine
- Creates and connects to a database
- Creates a table
- Inserts data
- Updates data
- Selects data
- Drops a table
- Disconnects
- Shuts down Derby
A quick look at the code
The SimpleApp.java application spends most of its time creating a table, inserting data into that table, and selecting the data back, demonstrating many JDBC calls as it does so. This section highlights the JDBC calls that make this specifically an embedded Derby application. The "Derby Network Server" section shows how the same JDBC calls turn the same code into a client/server application.Load the Embedded JDBC Driver
The SimpleApp application loads the Derby Embedded JDBC driver and starts Derby up with this code:
public String driver = "org.apache.derby.jdbc.EmbeddedDriver";
...
Class.forName(driver).newInstance();
Get an Embedded Connection
The SimpleApp application creates and connects to the derbyDB database with this code:
public String protocol = "jdbc:derby:";
...
conn = DriverManager.getConnection(protocol + "derbyDB;create=true", props);
That embedded connection URL, fully constructed, looks like this:
jdbc:derby:derbyDB;create=true
Shut Derby down
A clean shutdown performs a checkpoint and releases resources. If an embedded application doesn't shut down Derby, a checkpoint won't be performed. Nothing bad will happen; it just means that the next connection will be slower because Derby will run its recovery code.Code to shut down a specific database looks like this:
DriverManager.getConnection("jdbc:derby:MyDbTest;shutdown=true");
Code to shut down all databases and the Derby engine looks like this:
DriverManager.getConnection("jdbc:derby:;shutdown=true");
The SimpleApp.java code uses the second call to shut down
all databases and the engine.
You might also notice that it tests for a SQL exception.
A clean shutdown always throws SQL exception XJ015,
which can be ignored.
Compile sample application
Compile the sample application as shown below:
javac SimpleApp.java
You can safely ignore any compile warnings that might pop up.Run sample application
Run the sample application like this:
java SimpleApp
You should see the output shown below:
SimpleApp starting in embedded mode.
Loaded the appropriate driver.
Connected to and created database derbyDB
Created table derbyDB
Inserted 1956 Webster
Inserted 1910 Union
Updated 1956 Webster to 180 Grand
Updated 180 Grand to 300 Lakeshore
Verified the rows
Dropped table derbyDB
Closed result set and statement
Committed transaction and closed connection
Database shut down normally
SimpleApp finished
If instead you see an error like the one below, it means the class path
is not correctly set:
java SimpleApp
SimpleApp starting in embedded mode.
exception thrown:
java.lang.ClassNotFoundException: org.apache.derby.jdbc.EmbeddedDriver
at java.net.URLClassLoader$1.run(URLClassLoader.java:199)
at java.security.AccessController.doPrivileged(Native Method)
at java.net.URLClassLoader.findClass(URLClassLoader.java:187)
at java.lang.ClassLoader.loadClass(ClassLoader.java:289)
at sun.misc.Launcher$AppClassLoader.loadClass(Launcher.java:274)
at java.lang.ClassLoader.loadClass(ClassLoader.java:235)
at java.lang.ClassLoader.loadClassInternal(ClassLoader.java:302)
at java.lang.Class.forName0(Native Method)
at java.lang.Class.forName(Class.java:141)
at SimpleApp.go(SimpleApp.java:77)
at SimpleApp.main(SimpleApp.java:61)
SimpleApp finished
For help resolving class path problems, see the
"Configure Embedded Derby"
and
"Verify Derby"
instructions.
Embedded Derby supports multiple users in one JVM
Derby supports multiple connections to a given database.
An example of an embedded application that manages concurrent users
is a Tomcat or Geronimo application server that embeds Derby.
Any number of users can execute Web applications that access a database
through that Web server.
However, only one JVM may boot ("open") that database, so multiple applications running in different JVMs cannot access the same database. To understand this better, do the following.
The SimpleApp application created a database called derbyDB. In one window connect to this database with ij as shown below:
Now, in another window try to run your SimpleApp
application:
However, only one JVM may boot ("open") that database, so multiple applications running in different JVMs cannot access the same database. To understand this better, do the following.
The SimpleApp application created a database called derbyDB. In one window connect to this database with ij as shown below:
java org.apache.derby.tools.ij
ij version 10.4
ij> connect 'jdbc:derby:derbyDB';
ij>
java SimpleApp
SimpleApp starting in embedded mode
Loaded the appropriate driver
----- SQLException -----
SQL State: XJ040
Error Code: 40000
Message: Failed to start database 'derbyDB', see the next exception for details.
----- SQLException -----
SQL State: XSDB6
Error Code: 45000
Message: Another instance of Derby may have already booted the database C:\Apache\db-derby-10.4.1.3-bin\tutorial\derbyDB.
SimpleApp finished
The connection that SimpleApp tries to establish fails because
another application,
ij,
is already connected to the derbyDB database.
The problem is ij and SimpleApp are running in different JVMs and a given database can only be accessed from one JVM. The first application to connect "wins", in this case ij, and prevents other applications from connecting.
--------------------------------
Step 4: Derby Network Server
Introduction
As explained in
the "Embedded Derby" section,
an application can embed Derby,
which means that the Derby engine runs in the same JVM as the application.
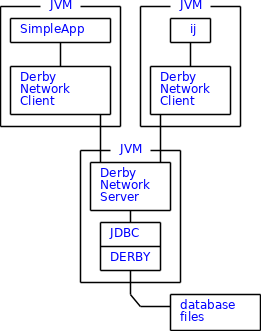
However, an application can also access a Derby database using the more familiar client/server mode. This is achieved via a framework that embeds Derby and handles database requests from applications, including applications running in different JVMs on the same machine or on remote machines. The Derby Network Server is such a framework. It embeds Derby and manages requests from network clients, as depicted in Figure 2.
Figure 2: Derby Network Server Architecture
This section shows how to start the Derby Network Server, configure your environment to use the Derby Network Client JDBC driver, and compile and run a simple Java application that uses the network server. The information presented here is minimal, just enough to help get new users started. For complete information, see part one of the Derby Server and Administration Guide.
Derby Network Server
First set the
DERBY_INSTALL
environment variable.
The Network Server starts Derby, so you'll find the derby.log error log in the directory where you start the Network Server.
Configure environment
To start or stop the Network Server, set your CLASSPATH to include the jar files listed below:- derbynet.jar: contains the code for the Derby Network Server and a reference to the engine jar file (derby.jar)
- derbytools.jar: contains Derby tools
Windows:
C:\> set CLASSPATH=%DERBY_INSTALL%\lib\derbytools.jar;%DERBY_INSTALL%\lib\derbynet.jar;.
UNIX:
$ export CLASSPATH=$DERBY_INSTALL/lib/derbytools.jar:$DERBY_INSTALL\lib\derbynet.jar:.
You can also use the script that the Derby software distribution provides
to set CLASSPATH.
Change directory to the
DERBY_INSTALL/bin directory,
then execute
setNetworkServerCP.bat (Windows) or
setNetworkServerCP (UNIX), as shown below:
Windows:
C:\> cd %DERBY_INSTALL%\bin
C:\Apache\db-derby-10.4.1.3-bin\bin> setNetworkServerCP.bat
UNIX:
$ cd $DERBY_INSTALL/bin
$ . setNetworkServerCP
Start Network Server
Start the Network server by executing the startNetworkServer.bat (Windows) or startNetworkServer (UNIX) script. This will start the Network Server up on port 1527 and echo a startup message:
Windows:
C:\Apache\db-derby-10.4.1.3-bin\bin> startNetworkServer.bat
Security manager installed using the Basic server security policy.
Apache Derby Network Server - 10.4.1.3 - (648739) started and ready to
accept connections on port 1527 at 2008-04-28 17:13:13.921 GMT
UNIX:
$ startNetworkServer
Security manager installed using the Basic server security policy.
Apache Derby Network Server - 10.4.1.3 - (648739) started and ready to
accept connections on port 1527 at 2008-04-30 09:35:55.871 GMT
Messages will continue to be output to this window as the Network Server
processes connection requests.
The Network Server starts Derby, so you'll find the derby.log error log in the directory where you start the Network Server.
An easier way: derbyrun.jar
Furthermore, it is much easier to start Network Server now than before, due to various jar file improvements. With the latest releases, the entire sections "Configure environment" and "Start Network Server" could actually be replaced with just one command line:
Windows:
C:\Apache\db-derby-10.4.1.3-bin\lib> java -jar derbyrun.jar server start
Security manager installed using the Basic server security policy.
Apache Derby Network Server - 10.4.1.3 - (648739) started and ready to
accept connections on port 1527 at 2008-04-28 17:13:13.921 GMT
UNIX:
$ java -jar derbyrun.jar server start
Security manager installed using the Basic server security policy.
Apache Derby Network Server - 10.4.1.3 - (648739) started and ready to
accept connections on port 1527 at 2008-04-30 09:35:55.871 GMT
Sample Application
Open a new window and set the
DERBY_INSTALL
environment variable.
If you use the embedded driver, by default the database is created in the same directory in which ij was started up. If you use the Derby Network Client JDBC driver, by default the database is created in the directory where the Network Server was started up; in other words, in DERBY_INSTALL/bin.
Derby provides many ways to specify the actual location. For example, the connection URL below specifies a full path for the database location:
By default this application runs in embedded mode. If you pass it the derbyclient argument at run time, then it will create and connect to the database using the Derby Network Client JDBC driver instead.
(Answer: In the default $DERBY_INSTALL/bin location.)
Configure environment to use Derby Network Client JDBC driver
To use the Derby Network Client JDBC driver, set your CLASSPATH to include the jar files listed below:- derbyclient.jar: contains the JDBC driver
- derbytools.jar: optional, provides the ij tool
Windows:
C:\> set CLASSPATH=%DERBY_INSTALL%\lib\derbyclient.jar;%DERBY_INSTALL%\lib\derbytools.jar;.
UNIX:
$ export CLASSPATH=$DERBY_INSTALL/lib/derbyclient.jar:$DERBY_INSTALL/lib/derbytools.jar:.
You can also use the script that the Derby software distribution provides
to set CLASSPATH.
Change directory to the
DERBY_INSTALL/bin directory,
then execute
the setNetworkClientCP.bat (Windows) or
setNetworkClientCP (UNIX) script as shown below:
Windows:
C:\Apache\db-derby-10.4.1.3-bin\bin> setNetworkClientCP.bat
UNIX:
$ . setNetworkClientCP
Test network server connection with ij
An embedded connection URL that creates and connects to a database looks like this:
java org.apache.derby.tools.ij
ij> connect 'jdbc:derby:MyDbTest;create=true';
A Derby Network Client connection URL is very close; just add
//localhost:1527/ before the database name:
java org.apache.derby.tools.ij
ij> connect 'jdbc:derby://localhost:1527/MyDbTest;create=true';
What is the physical location of the newly created database?
If you use the embedded driver, by default the database is created in the same directory in which ij was started up. If you use the Derby Network Client JDBC driver, by default the database is created in the directory where the Network Server was started up; in other words, in DERBY_INSTALL/bin.
Derby provides many ways to specify the actual location. For example, the connection URL below specifies a full path for the database location:
java org.apache.derby.tools.ij
ij> connect 'jdbc:derby://localhost:1527//home/bill/DerbyDb/MyDbTest;create=true';
The Developer's Guide provides information
about where Derby looks for databases:
Copy sample application
This section uses the same sample application that the "Embedded Derby" section uses.By default this application runs in embedded mode. If you pass it the derbyclient argument at run time, then it will create and connect to the database using the Derby Network Client JDBC driver instead.
A quick look at the code
The SimpleApp.java application spends most of its time creating a table, inserting data into that table, and selecting the data back, demonstrating many JDBC calls as it does so. This section highlights the JDBC calls that make this specifically a client/server Derby application. The "Embedded Derby" section shows how to turn the same code into an embedded application.Load the Client JDBC Driver
When executed with the derbyclient argument, the SimpleApp application loads the Derby Network Client driver with this code:
driver = "org.apache.derby.jdbc.ClientDriver";
...
Class.forName(driver).newInstance();
Get a Network Server Connection
When executed with the derbyclient argument, the SimpleApp application creates and connects to the derbyDB database with this code:
protocol = "jdbc:derby://localhost:1527/";
...
conn = DriverManager.getConnection(protocol + "derbyDB;create=true", props);
That connection URL, fully constructed, looks like this:
jdbc:derby://localhost:1527/derbyDB;create=true
Don't shut Derby down
If you look at the SimpleApp.java code you'll notice that it only shuts Derby down if it's running in embedded mode. When connecting via the Network Server, other applications might be accessing the same database you are; so, don't shut down the databases or Derby.Compile Sample Application
Compile the sample application as shown below:
javac SimpleApp.java
Run Sample Application
Run the sample application like this:
java SimpleApp derbyclient
You should see the output shown below:
SimpleApp starting in derbyclient mode.
Loaded the appropriate driver.
Connected to and created database derbyDB
Created table derbyDB
Inserted 1956 Webster
Inserted 1910 Union
Updated 1956 Webster to 180 Grand
Updated 180 Grand to 300 Lakeshore
Verified the rows
Dropped table derbyDB
Closed result set and statement
Committed transaction and closed connection
SimpleApp finished
Quick question:
Where is the physical location of the derbyDB database
that the sample application creates?
(Answer: In the default $DERBY_INSTALL/bin location.)
Stop Network Server
Stop the Network server by executing the
stopNetworkServer.bat (Windows) or
stopNetworkServer (UNIX) script, as shown below:
Note that, as with starting the server, there is also an easier way to shut down the server. For example:
Windows:
C:\> cd %DERBY_INSTALL%\bin
C:\Apache\db-derby-10.4.1.3-bin\bin> setNetworkServerCP.bat
C:\Apache\db-derby-10.4.1.3-bin\bin> stopNetworkServer.bat
UNIX:
$ cd $DERBY_INSTALL/bin
$ . setNetworkServerCP
$ stopNetworkServer
The window running the NetworkServer should output a
message confirming the shutdown.
Note that, as with starting the server, there is also an easier way to shut down the server. For example:
Windows:
C:\> java -jar %DERBY_INSTALL%\lib\derbyrun.jar server shutdown
UNIX:
$ java -jar $DERBY_INSTALL/lib/derbyrun.jar server shutdown
Run derbyrun.jar without arguments for further usage information.
derbyrun.jar has been included with Derby releases since the 10.2 release
series.
Next Steps
Network Server Options
By default, the Derby Network Server only accepts requests from the localhost on port 1527. You can modify the Network Server to:- Listen on a port other than the default.
- Accept requests from outside the localhost.
- Run in the Java 2 Security Manager for increased security, which we strongly recommend.
Embedded Server
Up until this point, this section has focused on how to start and stop the Network Server as an independent process.Another option, called the "embedded server", allows an application to load the embedded JDBC driver for its own use and start the Network Server to allow remote access by applications running in other JVMs. The application that does this can access the database with either the embedded driver or the client driver.
Figure 3 depicts an application called MyEmbedSrvApp that loads the embedded driver and also starts up the Network Server. This allows other applications, such as ij or SimpleApp using the Derby Network Client, to connect to the same database via a client JDBC driver.
Figure 3: Derby Embedded Server Architecture
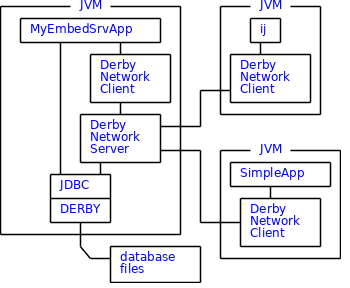
While it is certainly possible for MyEmbedSrvApp to use the Derby Network Client JDBC driver, it's probably better for it to use the embedded driver because Derby Network Client JDBC database requests incur the overhead of going out through the network. The embedded server architecture lets the application that embeds Derby retain the advantages of embedded access while also enabling remote access to the same database using another tool, such as ij. Thus, you end up with the best of both worlds: embedded and client/server.
You've reached the end of this Derby tutorial and should now understand how to use Derby in the embedded and Network Server frameworks.
No comments:
Post a Comment